> ## Documentation Index
> Fetch the complete documentation index at: https://docs.eat-now.io/llms.txt
> Use this file to discover all available pages before exploring further.
# Setting up the waitlist
> Enable the waitlist per shift, pick the right confirmation mode for your team, and tune the queue limits.
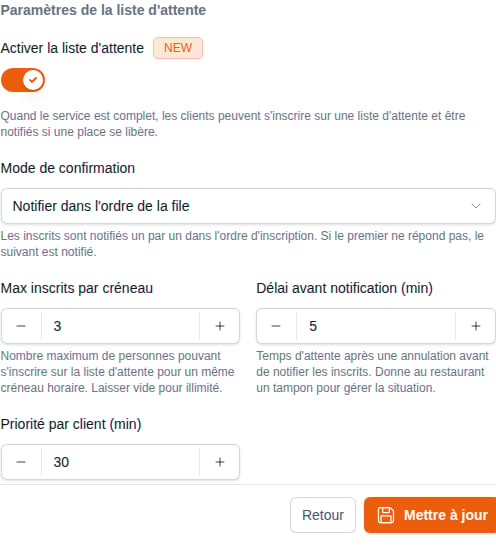
The waitlist is enabled **shift by shift**. Open **Settings → Opening days → Shifts**, pick a shift, and find the **Waitlist settings** card. Turn on **Enable waitlist** to reveal the options.
The waitlist is part of your EatNow plan. If the toggle is greyed out with a lock, it's not included in your current plan — contact support to enable it. Shifts that already have a waitlist keep it in any case.
 ## Choosing the confirmation mode
This is the important decision: **what happens when a spot frees up?**
| Mode | What happens | Best for |
| ------------------- | ---------------------------------------------------------------------------------------------------------------------------------------------------------------------------- | -------------------------------------------------------------------------------------- |
| **Manual** | Nothing automatic. Your team sees the queue and offers spots by hand. | Full control; teams that want to pick *who* gets the table (regulars, large parties…). |
| **Notify all** | Every waiting guest for that slot is notified at once — **first to confirm wins**. | Filling the table as fast as possible; busy shifts where speed beats fairness. |
| **Notify in order** | Guests are notified **one at a time, in queue order**. Each gets an exclusive priority window; if they don't confirm in time, the offer expires and moves to the next guest. | Fairness; a premium "you're next in line" experience. |
Not sure? Start with **Manual**. You keep the queue's benefits (capturing demand, seeing who's interested) while your team decides case by case. Switch to an automatic mode once you trust the flow.
## The other settings
* **Max waitlist size per slot** — caps how many guests can queue for the same time slot. Leave it empty for no limit. A small cap (3–5) keeps expectations realistic: being 12th in line for one table is a promise you can't keep.
* **Notification delay (min)** — when a reservation is cancelled, the system waits this long before processing the queue. This buffer (0–15 min) gives your team a moment to react — for example to call back the guest who cancelled, or seat a walk-in — before the spot is offered away. Several cancellations on the same slot within the window are handled as one release, so the queue isn't spammed.
* **Priority per guest (min)** — how long an offer stays open before it moves on (to the next in line in **Notify in order**). 30 minutes is a good default; an offer always closes when the slot starts, and is never shorter than 5 minutes — a slot starting sooner is no longer offered.
## What the guest receives
Notifications are automatic on both channels, using your portal colors and your custom templates if you have any:
* **Email** — always, when the guest left an email address.
* **WhatsApp** — if your WhatsApp integration is connected. Two dedicated templates (*Waitlist — joined* and *spot available*) are created and submitted for approval automatically when the integration is set up.
Three moments trigger a message:
1. **Joining** — "You're on the waitlist" (and, explicitly, *not booked yet*), with a link to track or cancel the request.
2. **Spot available** — one clear call to action, **Confirm my spot**. In *Notify in order* the message states the exact deadline ("held for you until 8:30 PM"); in *Notify all* it says first come, first served.
3. **Confirmed** — as soon as the spot is confirmed, the guest receives **your regular reservation confirmation email** (recap + calendar invite). No separate template: your existing customizations apply.
The two waitlist emails can be customized per shift and per language in **Settings → Notifications → Email templates** (the **Waitlist** types), and toggled individually in **Settings → Notifications**, like every other guest notification.
## Good to know
* The waitlist never overbooks by itself: every confirmation — by the guest or by your team — goes through the same capacity checks as a normal booking, at the moment it happens. Only your team can force: when confirming on the guest's behalf, or by offering a spot anyway — the guest's confirmation then books past capacity.
* Entries whose slot has started are closed automatically within the hour (marked **Expired**).
* A **block** also closes the waitlist on its slots, with or without a message: guests don't see the button and cannot join. A block limited to one room leaves it open. Your team can still add a guest by hand.
* Guests can leave the queue at any time from their personal link — the spot then naturally goes to the next person.
## Choosing the confirmation mode
This is the important decision: **what happens when a spot frees up?**
| Mode | What happens | Best for |
| ------------------- | ---------------------------------------------------------------------------------------------------------------------------------------------------------------------------- | -------------------------------------------------------------------------------------- |
| **Manual** | Nothing automatic. Your team sees the queue and offers spots by hand. | Full control; teams that want to pick *who* gets the table (regulars, large parties…). |
| **Notify all** | Every waiting guest for that slot is notified at once — **first to confirm wins**. | Filling the table as fast as possible; busy shifts where speed beats fairness. |
| **Notify in order** | Guests are notified **one at a time, in queue order**. Each gets an exclusive priority window; if they don't confirm in time, the offer expires and moves to the next guest. | Fairness; a premium "you're next in line" experience. |
Not sure? Start with **Manual**. You keep the queue's benefits (capturing demand, seeing who's interested) while your team decides case by case. Switch to an automatic mode once you trust the flow.
## The other settings
* **Max waitlist size per slot** — caps how many guests can queue for the same time slot. Leave it empty for no limit. A small cap (3–5) keeps expectations realistic: being 12th in line for one table is a promise you can't keep.
* **Notification delay (min)** — when a reservation is cancelled, the system waits this long before processing the queue. This buffer (0–15 min) gives your team a moment to react — for example to call back the guest who cancelled, or seat a walk-in — before the spot is offered away. Several cancellations on the same slot within the window are handled as one release, so the queue isn't spammed.
* **Priority per guest (min)** — how long an offer stays open before it moves on (to the next in line in **Notify in order**). 30 minutes is a good default; an offer always closes when the slot starts, and is never shorter than 5 minutes — a slot starting sooner is no longer offered.
## What the guest receives
Notifications are automatic on both channels, using your portal colors and your custom templates if you have any:
* **Email** — always, when the guest left an email address.
* **WhatsApp** — if your WhatsApp integration is connected. Two dedicated templates (*Waitlist — joined* and *spot available*) are created and submitted for approval automatically when the integration is set up.
Three moments trigger a message:
1. **Joining** — "You're on the waitlist" (and, explicitly, *not booked yet*), with a link to track or cancel the request.
2. **Spot available** — one clear call to action, **Confirm my spot**. In *Notify in order* the message states the exact deadline ("held for you until 8:30 PM"); in *Notify all* it says first come, first served.
3. **Confirmed** — as soon as the spot is confirmed, the guest receives **your regular reservation confirmation email** (recap + calendar invite). No separate template: your existing customizations apply.
The two waitlist emails can be customized per shift and per language in **Settings → Notifications → Email templates** (the **Waitlist** types), and toggled individually in **Settings → Notifications**, like every other guest notification.
## Good to know
* The waitlist never overbooks by itself: every confirmation — by the guest or by your team — goes through the same capacity checks as a normal booking, at the moment it happens. Only your team can force: when confirming on the guest's behalf, or by offering a spot anyway — the guest's confirmation then books past capacity.
* Entries whose slot has started are closed automatically within the hour (marked **Expired**).
* A **block** also closes the waitlist on its slots, with or without a message: guests don't see the button and cannot join. A block limited to one room leaves it open. Your team can still add a guest by hand.
* Guests can leave the queue at any time from their personal link — the spot then naturally goes to the next person.